
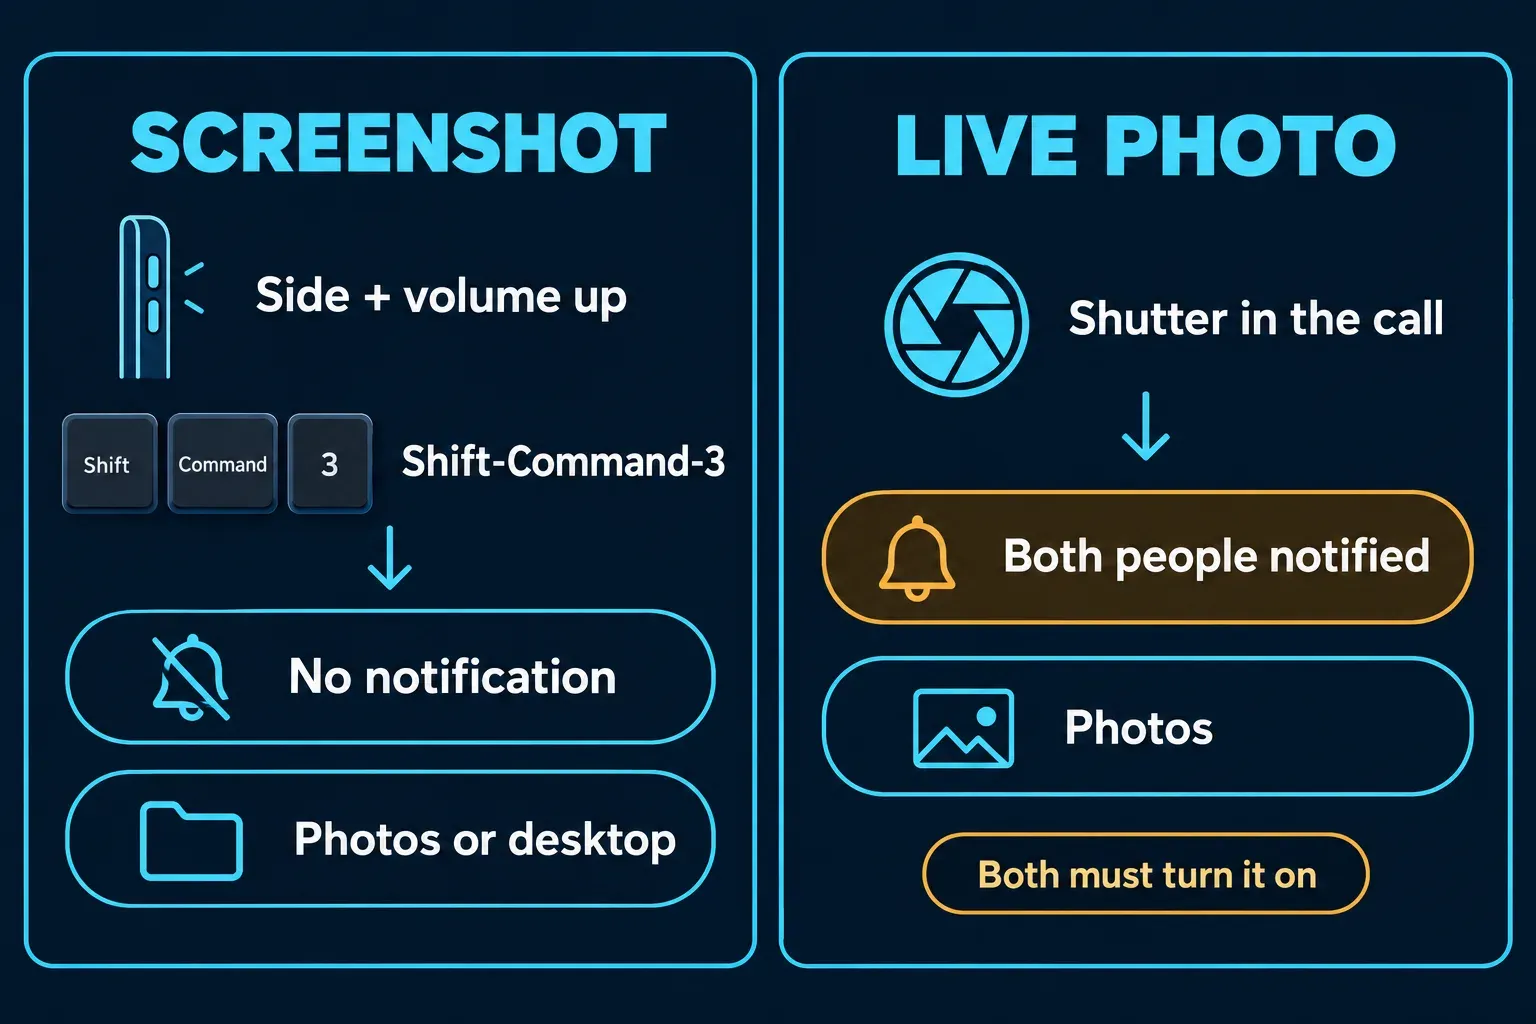
Press the side button and volume up together on an iPhone with Face ID, the top button and either volume button on an iPad, or Shift-Command-3 on a Mac. That's an ordinary screenshot, and FaceTime doesn't tell the other person. The other way to keep a moment is FaceTime's own Live Photo button, which saves a short clip with sound to Photos and sends both of you a notification.
Which one you want depends on whether you'd rather be quiet or capture the moment with sound. Below are the steps for each device, the iOS 26 change that makes screenshots cover the call, where the files end up, and what to check when the Live Photo button won't work.
Screenshot or FaceTime Live Photo: which should you take?
| Detail | Screenshot | FaceTime Live Photo |
|---|---|---|
| How you take it | Device buttons on iPhone or iPad, Shift-Command-3, 4 or 5 on a Mac | The shutter button in the FaceTime call |
| Is the other person told? | Apple describes no notice | Yes, you both get a notification |
| What it captures | Everything on your screen, including the call buttons and your own tile if they're showing | One person's video, plus a moment before and after with sound |
| Where it saves | Photos on iPhone and iPad, the desktop on a Mac | Photos on every device |
| What it needs | Nothing | FaceTime Live Photos turned on by both people, in a country or region where it's offered |
I'd take a screenshot for a quick private grab, a funny face or something on the other person's screen, and use the Live Photo when the moment is worth keeping with sound and the notice doesn't matter, like a baby's first word on a family call.
How do you screenshot a FaceTime call on iPhone or iPad?
Use the same buttons as any other screenshot. Press both at the same time and let go quickly, as Apple's iPhone screenshot instructions describe:
- iPhone with Face ID: side button and volume up.
- iPhone with a Home button: side button and Home, or top button and Home on the oldest models.
- iPad with Face ID: top button and either volume button.
- iPad with a Home button: top button and Home.
Watch what's on the screen before you press. FaceTime's buttons pop up when you tap the screen, so if you've just tapped, they'll be in the shot along with your own tile. For a frame that's mostly the other person, wait until the controls have gone.
On iOS 26 and later, the screenshot opens full screen with editing tools right away, which hides the call for a moment. Apple's current iPhone guide says a full-screen screenshot reaches your photo library only after you swipe up or tap the save button and choose an option, while thumbnail screenshots save automatically. To get the small corner thumbnail back, go to Settings > General > Screen Capture and turn off Full-Screen Previews, the switch Apple lists in its screen capture settings.
I'd flip that switch before a call where I expect to take several shots, because the full-screen editor covers the call every time and a thumbnail just saves and gets out of the way.
If the buttons are awkward mid-call, Back Tap, AssistiveTouch and Siri can take the screenshot on iPhone, and on iPad an Apple Pencil swipe up from a lower corner does it, per Apple's iPad screenshot page.
How do you screenshot FaceTime on a Mac?
The shortcut I'd use is Shift-Command-4, then Space, then a click on the FaceTime window, because it captures just the call and leaves the rest of your desktop out. The full set from Apple's Mac screenshot guide:
| Shortcut | What it captures |
|---|---|
Shift-Command-3 | The whole screen |
Shift-Command-4, then drag | The area you drag over; hold Space while dragging to move the selection |
Shift-Command-4, then Space, then click | The FaceTime window; hold Option while you click to leave out the window shadow |
Shift-Command-5 | The Screenshot app, with a timer and a choice of where files save |
Screenshots save to the desktop unless you've picked another folder in the Screenshot app's Options menu. My guide to taking a screenshot on a Mac covers each shortcut in more depth, and if a shortcut does nothing, start with the Mac screenshot fixes.
How do you take a FaceTime Live Photo?
Turn the feature on first, then use the shutter in the call. Both of you need it on, so it's worth checking before the call starts.
On iPhone or iPad:
- Go to Settings > Apps > FaceTime and turn on FaceTime Live Photos.
- During a video call, tap the screen to show the controls.
- In a call with one person, tap the Take Live Photo button. In a group call, tap the tile of the person you want first, then tap the button.
Apple's FaceTime Live Photo guide for iPhone says the camera records what happens just before and after the shot, including audio, and that the feature isn't offered in every country or region. On older versions of iOS the switch sat directly under Settings > FaceTime.
On a Mac:
- Open the Photos app once if you never have. FaceTime saves Live Photos to your Photos library, and Photos doesn't need to be open during the call.
- In FaceTime, choose FaceTime > Settings, click FaceTime and select FaceTime Live Photos. Do this before the call, because the option is unavailable while one is running.
- During a call with one person, select the FaceTime window. In a group call, double-click the person's tile.
- Click the Take Picture button in the top-right corner of the window.
Apple's Mac FaceTime Live Photo steps add a detail the top results skip: selecting that checkbox also lets other people take Live Photos of you. It's a two-way switch, not a private one.
Does FaceTime notify the other person when you screenshot?
Not for an ordinary screenshot. The notice Apple documents is tied to the Live Photo shutter: "You both receive a notification that the photo was taken." A screenshot made with your device's buttons or keyboard shortcut is a system capture, and Apple doesn't describe any FaceTime alert for it. ScreenSnap's FaceTime screenshot guide for Mac says the same: regular screenshots send no notification, Live Photos notify both sides.
So if you want to keep a frame without the other person knowing, a screenshot does it, and the Live Photo won't. I'd still mention it if I were saving someone's face from a call, because silent in FaceTime doesn't mean private once the picture is shared.
Messaging apps handle this very differently, and some do send screenshot alerts. My guides cover Snapchat, Instagram, WhatsApp and Telegram one by one.
Where do FaceTime screenshots and Live Photos go?
- Screenshots on iPhone or iPad go to Photos. Open Collections > Media Types > Screenshots to see only them. On iOS 26 and later, a full-screen screenshot is only there if you saved it from the editor.
- Live Photos go to the Photos library on iPhone, iPad and Mac. iPhone Life's guide to finding FaceTime photos notes they sit in the main library by date, mixed in with everything else, so scroll to the day of the call.
- Screenshots on a Mac land on the desktop by default. If they don't, the Screenshot app has a different folder set; my guide on where Mac screenshots go shows how to check.
Why isn't the FaceTime Live Photo button working?
Go through these in order:
- One of you has the setting off. Apple's Mac guide says that if you can't take a Live Photo of someone, both of you need FaceTime Live Photos on. Ask the other person to check theirs.
- You turned it on during the call. On a Mac the checkbox is unavailable mid-call. Hang up, select it, and call back.
- It isn't offered where you are. Apple says FaceTime Live Photos aren't available in all countries or regions, and nothing in Settings fixes that.
- Nothing appears in Photos on a Mac. Open the Photos app once so FaceTime has a library to save into.
- You're in a group call. Pick the person's tile first: tap it on iPhone or iPad, double-click it on a Mac.
If none of that helps before the moment passes, take a screenshot instead. You lose the sound, but you keep the frame.
And if a regular screenshot seems to vanish on iPhone, it probably never left the full-screen editor. Turn off Full-Screen Previews as described above so every screenshot saves on its own.
Before you share a FaceTime screenshot
A call screenshot usually carries more than the face you wanted: the call buttons, your own tile and, in a group call, everyone else's faces too. Crop to the person first, using the crop steps for Mac screenshots on a computer or the crop tool in the screenshot editor on iPhone. Blur anyone who didn't agree to be in the picture, and check for names or numbers before posting it anywhere, with my guide to redacting personal information in a screenshot.
For one moment from a family call, the built-in tools are all you need. If you capture video calls on a Mac regularly, for remote support sessions or interview notes, Snagit for Mac saves a step or two: its window capture grabs the call, and the editor crops, blurs and labels it in one place before you share it.